
Showing posts with label nail polish. Show all posts
Showing posts with label nail polish. Show all posts
Tuesday, May 28, 2013
Union Jack & Polka Dots Mani
Hi all! I just got back from studying abroad/vacationing in Europe and one of my stops there including London.... obsessed. I already loved everything British beforehand, but going to London just solidified my love and obsession with it. So, being on my British high, I of course had to incorporate something British into my nails! For the pink I used Essie's "Mod Square" and for the turquoise I used Essie's "Turquoise & Caicos" ... both great colors for summer too! For the Union Jack, I used a striping brush, and for the polka dots I used Sally Hansen's nail art pens.. both incredibly easy to do! For the Union Jack, I did the "X" first.. a wider base of white, then a thinner stripe of the pink. BE SURE THE WHITE & PINK ARE DRY!! Before doing all of the separate layers, be sure that each color is dry, otherwise there'll be spreading and mixing and it'll just be a big mess. After the X is dry, I did the "+" part of the flag. Again, wider stripes for the white and thin stripes for the pink. Once all is dry, seal it in with your top coat and you're set! It's brilliantly British!! xx

Friday, February 15, 2013
Pink, Black, & White Multi Mani
So. I'm completely obsessed with this mani. It's super girly and fun and got me so many compliments! For the polish, I used OPI's Pink Friday, Sinful Color's Snow Me White, and Wet N Wild's Ebony Hates Chris. I also used Sally Hansen's nail art pens in white and black. For the pinky, I did two coats of the pink and then used the nail pens to create the leopard. On the ring finger, I also did two coats of the pink and waited for it to completely dry, and then used the hole reinforcer method to make the half-moon mani. For the middle and pointer fingers, I did two coats of the white and then did the stripes and polka dots with the nail pen. I really wanted to do a pink heart on the striped nail, but ran out of time and blah blah. Thumb nail, did the two coats of pink again and two coats of China Glaze's World's Away (part of their Cirque collection). As always, a top coat to finish it off!


Monday, January 21, 2013
Mint and Glitter Half-Moon Mani
Happy MLK Jr. Day! Hope everyone is enjoying their day off! For this super cute mani I used Wet N Wild's Fast Dry in #229C Ebony Hate Chris, China Glaze's #551 Fairy Dust, and Revlon's #85 Minted. This manicure started off as just black, but then it started to chip and I didn't feel like changing it, so I touched up the chips and threw on the glitter. (The glitter is awesome, by the way! It's holographic glitter and shines like crazy in the light!) Then that started to chip and I still didn't feel like changing it, so I stuck on the hole reinforcers and made the mani minty fresh! Top coat to seal it all in, of course!


Friday, January 11, 2013
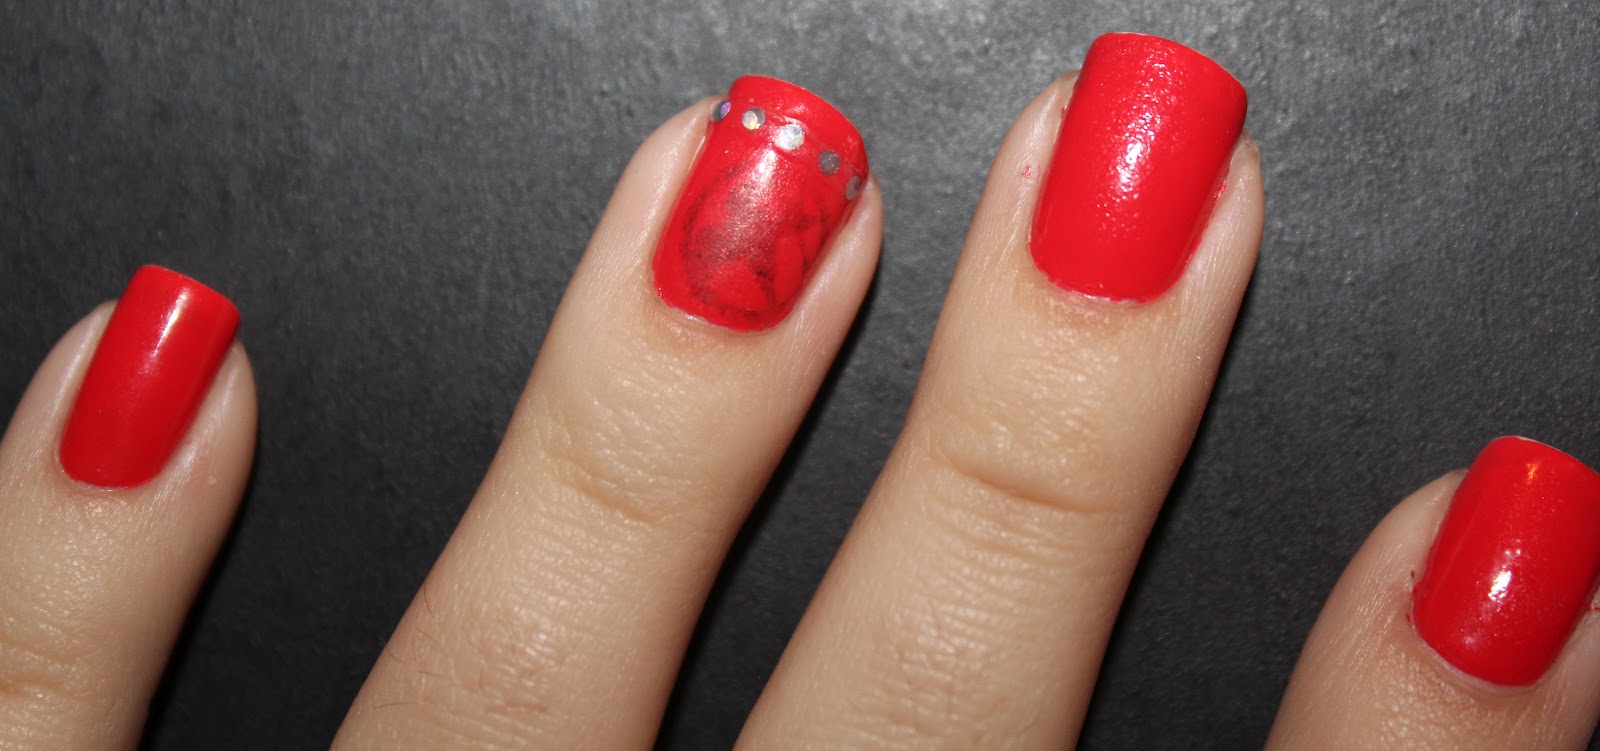
Red and Pink Leopard Mani
This mani originally was just a basic red, but I thought, "Hey, let's spice it up some," so I did leopard, naturally. For the red I used Rimmel Lasting Finish Pro in #375 Stiletto Red and to make the leopard I used Sally Hansen's nail art pens in pink and black. For the tutorial on how to do a leopard mani, click here. I PROMISE it only takes 15 minutes!! Don't forget your top coat! (Especially if you use the Sally Hansen nail art pens- they wipe off easy without it!)


Monday, December 31, 2012
NYE Mani
Ah I haven't posted in ages!!! I'm so bad at this!! Whatevs.... I'm just super excited to share my NYE manicure with you all now!! I already love glitter and anything that shines, so NYE is one of my fave holidays because it gives me even more of an excuse to sparkle! Tonight I'll be wearing a multi-colored glittered clutch, so naturally I had to have my nails match. For this mani I used black (my favorite is Wet N Wild Fast Dry in #229C Ebony Hates Chris... I usually only need one coat and it dries super quick!... Winner!!). Then, I did one or two coats of Wet N Wild Party of Five Glitters (depending on the glitter disbursement on each nail). This is one of my absolute favorite glitter polishes A. because it has different sizes and colors, B. because it shines unbelievably, and C. because it's super inexpensive! Top coat to seal it all in and you're done! Hope you all have a good and sparkly New Year's Eve and a fabulous year to come!


Saturday, November 10, 2012
James Bond Mani
So I'm super excited to go see the new James Bond movie, Skyfall, that just came out, and I of course had to do my nails for the occasion!! This was a fairly easy manicure... takes some patience and time to do the 007 nail stickers, but it's totally worth it. For the black I used Wet N Wild's Fastdry in Ebony Hates Chris and for the white on the tuxedo I used Sally Hansen Hard as Nails Xtreme Wear in White On. (For the white on the sticker, I use white acrylic paint.) So anyways, two coats of black, except on whichever finger(s) you want the tuxedo on. For the tuxedo nail, I did two coats of the white in a triangle sort of way, so it wouldn't be too clumpy when I painted the black over it. Wait for the white to semi-dry, then do the edges with the black. For the "buttons" and "bow tie" I used a toothpick with the black polish, but if you have a polish pen, I would probably use that. For the 007, I made my own nail sticker and applied them once the black polish was pretty dry, so it's easier to press down on the sticker for air bubbles. Hope everybody goes to see the new movie!!!


Wednesday, October 31, 2012
Candy Corn Mani
So this is definitely one of my favorite manis I've done and people seem to agree, as I get so many compliments on them!!! The colors I used for this are Piggy Polish in Funshine (yellow), Sally Hansen Hard as Nails Xtreme Wear in Sun Kissed (orange), and Sally Hansen Hard as Nails Xtreme Wear in White On. First I did my base coat (duh), then two coats of the yellow. Then I waited for it to partially dry (I'm very impatient) and then took the orange and brushed two coats of it horizontally on my nails. The first time I did this mani, I was surprised how straight the lines came out, but it's easy if you just do a quick swipe of the polish. Then I did two coats of the white for the tips. DEFINITELY seal it with a top coat!!!!! It's very lumpy otherwise!! Happy Halloween all!!


Thursday, October 11, 2012
Caviar Spiderweb Mani
So I know I haven't posted in a while, but Halloween is coming up and I'm super into holidays, so I will be posting a bunch for Halloween. First up is an accent finger with a spiderweb made out of caviar beads (AKA microbeads from a craft store). I'm already apologizing in advance for the horrible quality photo... forgot to take it with my camera before I left, they got ruined, blah, blah. Anyways, the color is Essie #760 Carry On (it's an extremely dark purply brown). Then I used my top coat (Out the Door) and lightly brushed my dotting tool I got from Sephora with the top coat and painted/dotted little sections with it on my nail. Moving quickly I dipped the dotter into my silver microbeads and positioned them onto my nail to begin forming the spiderweb. You have to keep repeating these steps and do little sections one at time, as the polish will dry too much for the beads to stick if you just did one coat. After I finished the web, I put an extremely thick top coat over it.... huge mistake. The top coat itself wasn't a mistake because otherwise the microbeads would've immediately started falling off, but the thickness of the coat was. It gave me SO many air bubbles. So, what I would suggest is doing a thin top coat, waiting for it to dry, and then doing another thin coat, because those suckers fall off so easily.


Friday, September 21, 2012
Fairy Dust Glitter Ombre Mani
My favorite way to cover up wear and chips on my nails is to do a glitter ombre on them! They're super easy to do and look so pretty! What I like to do is first paint a thin coat of glitter just on the tips. Then, one nail at a time, I put a glob of glitter on the tips and brush it back. Finish with a top coat and done! It looks like a fairy sprinkled some magic dust on them, right?! The pale pink is Sinful Colors in Easy Going and the glitter is Nicole by OPI in Twist of Fate. Be sure to use a fine glitter polish for this and not a large glitter, as you wouldn't get the same effect.


Thursday, September 6, 2012
Fashion's Night Out Mani!
Happy Fashion Week and Fashion's Night Out!! Just wanted to post my mani for tonight before I head out! With FNO's colors being black, white, and red, I of course had to follow that color scheme on my nails! I did two firsts for me on this mani: Louboutin nails and made my own nail "sticker." I first did the Louboutin part, which is just painting red underneath the nail. I used Wet N Wild's Wild Shine #414A and also used my base coat and top coat. For the top of my nails, I used Wet N Wild's Fastdry in Ebony Hates Chris. Then, I made my own nail sticker with FNO's logo and stuck a red square gem on it! Hope everyone has fun shopping and enjoying all the festivities tonight!!


Monday, September 3, 2012
Orange & Turquoise Leopard Mani!
So I've posted a leopard mani before, but I just did this one and loved the color combo so I of course had to share it! I got so many compliments on them from random people!! As I've said before, they're super easy to do, but nobody believes me!! They take me literally ten minutes to do! In my post about my first leopard mani, I only put a couple of leopard spots, but now in doing this one, I think for a true leopard effect, there should be about nine spots on each nail! The colors I used for this are China Glaze's Peachy Keen and Sally Hansen's nail art pens in turquoise and black.


Monday, July 16, 2012
Flower Power
Hola! Yes, I know, I haven't posted in forever, but anyways!! For this floral mani I used Essie Tart Deco (mango), OPI Steady as She Rose (a blushy pink/purple), Revlon #85 Minted, Sally Hansen Complete Salon Manicure #420 Yellow Kitty, and Sinful Colors #101 Snow Me White and you're going to need a tiny paint brush (preferably an inexpensive one because it can get a little funky after using it with nail polish). First I did two coats of the white and waited for it to completely dry. Then I used the paintbrush and just splotted little circles and did two coats of each color. Then I took black polish (I think it was Sally Hansen Xtreme Wear) and dotted it with a toothpick, but I wouldn't recommend using that polish for this because it ran when I put my topcoat on it!! And I put the topcoat on like six hours after, so it was definitely dry! Also the toothpick created too big of dots on some of them, so I would suggest using the nail art pens for better control. Also, don't forget to clean your paintbrush with nail polish remover! (I did it in between each color.)


Tuesday, June 12, 2012
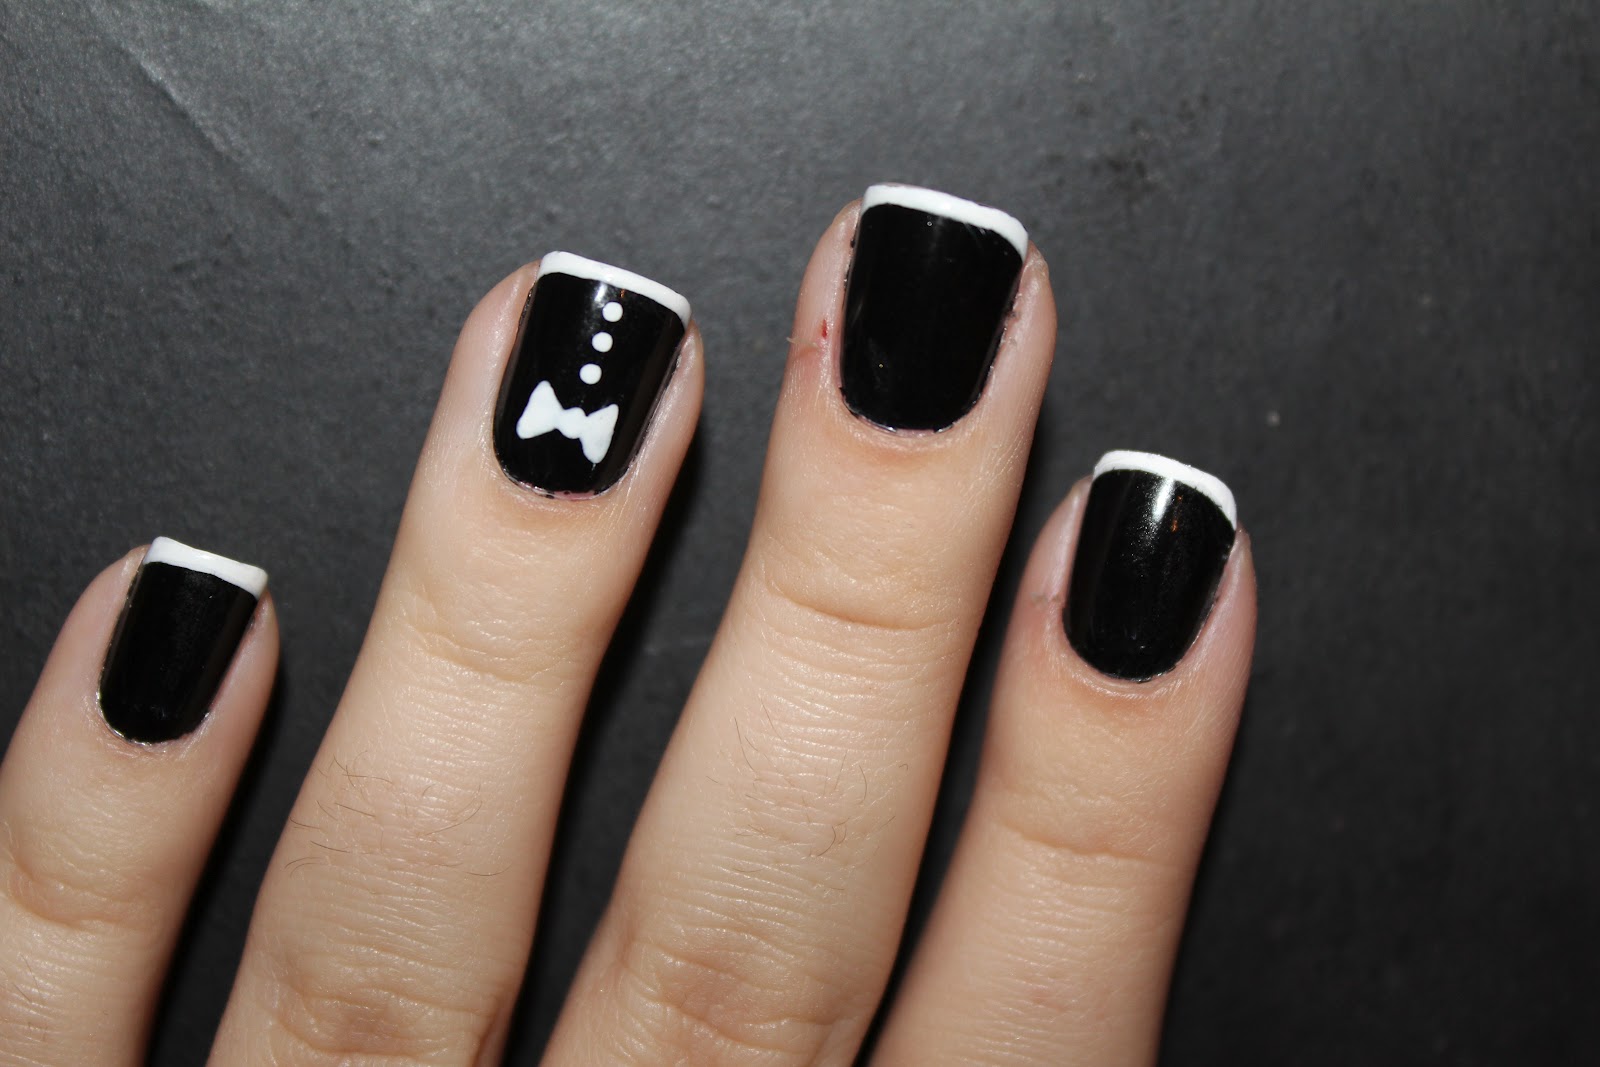
Tuxedo Mani!
So I'm obsessed with this mani! It was inspired by Zooey Deschanel's one from one of the award shows she went to! I reversed hers and just did the tux on one nail & love it!! I used Wet N Wild's Fastdry in #229C Ebony Hates Chris and Sally Hansen's nail art pens in white!

Monday, June 4, 2012
My Birthday Mani!!
Again. I've neglected this blog. I'm trying people, I am. Anyways tomorrow is my birthday (my first one I'm depressed about) and I have these fabulous gold sparkle shoes I'm wearing, so duh, I had to make my mani match! I used two coats of Essie's Tart Deco (obsessed with this color!) and multiple coats (I lost count) of Milani's Jewel FX #531 Gold (just until it was solid)!!! That's it! The sparkles shine really nicely in the sunlight also!!


Monday, April 30, 2012
Strawberry Mani!
So I knew this was going to happen. I was going to get too caught up in other things and neglect this blog, but I'm back now. School's over and I'm not working that much, so I plan on fulfilling my previous promise of posting at least one thing every week! Today I have my strawberry manicure! For this I used Wet N Wild's Wild Shine #414A, (it's a red that has a slight berry tint to it), NYC's #298 High Line Green, and any black would do, but I used Sally Hansen's Xtreme Wear #370 Black Out. First I painted them two coats of the red and waited for them to completely dry! Next I just painted on green tips, then I used a paint brush to do the points, (again, I did two coats, but it could take you more depending on how much you use. I sort of globbed it on, which made it a little lumpy, but my top coat smoothed it out). Finally, I used a paintbrush, (but you could use a toothpick) to do the seeds. I did two coats, but I really depends on what black you use! Of course, a top coat to seal it all in and smooth everything out and done! It's a great mani for the summer!

Monday, March 26, 2012
Caviar Mani
If you've been on Pinterest lately, I'm sure you've seen the "Caviar" mani making the rounds... It's that tiny little microbead mani. I did this mani back in October, and everybody loved it, so I decided to do it again! In October I did a gunmetal polish with silver beads to go with my outfit then, and this weekend I did black polish with gold beads, to match my outfit now. Everybody loved it again. :) Since I was only using the microbeads as my accent nails, I did them first so that I wouldn't mess up my other nails if they were wet. I used Sally Hansen's #310 Gilty Pleasure as the base for the gold microbeads. I did two coats of this. Immediately after I did my second coat, I dipped my finger into my container of microbeads. (You can dip them or sprinkle them. I prefer to sprinkle because I feel like it just makes it non-clumpy. Like, when I dipped my nail, there was a ton of extra beads stuck on it, which are easy to remove and flatten, but it's just extra work. If you are going to sprinkle though, be sure to do it over a plate or something to catch those little buggers! They seriously go all over.) After I got rid of all of the excess beads, I did an generous coat of my Out the Door top coat. In the future I think I would try using a different top coat, maybe one that doesn't fill in a bunch, but you don't even have to use a topcoat if you don't want. I just feel it seals it in better so they don't fall off as easily. For the rest of my fingers I used Wet N Wild's Fastdry in #229C Ebony Hates Chris. (It truly is fast drying. Like, it's amazing.) I only used one coat of this and it gave me a fantastic opaqueness. You really don't need a top coat for it because it shines really nice, but I did anyways. Hope you guys try this mani out!! It's truly eye catching and everybody will want to touch them!


These are the microbeads. I got mine from Michael's and I think they were about $4.00. Mine were in the aisle near stamping supplies. They come in loads of different colors and also in little mini packs with the different colors.


You can see where some of my beads fell off after a long day of work.... Super easy to fix though. Just take a toothpick, dab it with some top coat, dab it on the nail, put the toothpick in the microbeads, and place them where they're needed.
Thursday, March 22, 2012
Hunger Games Mani
Happy Hunger Games! So I haven't read the books (I'm thinking about it), but I'm super excited for the movie to come out tomorrow! For this mani I used OPI Cajun Shrimp. Make sure it's super, super dry before doing the next steps! (Like a couple of hours, at least.) Okay so then I printed out the mockingjay icon and printed it out on a laser jet printer (the size of it was .38 in x .4 in). Then I cut it out and got rid of as much excess paper as possible, laid it on my nail, and used a paper towel with rubbing alcohol on it. Rub the paper towel on the cutout for like two minutes and press down hard to make sure the image transfers (why the nail needs to be completely dry). Remove the paper. Now, it most likely won't be a solid image, (mine wasn't) so what I did next was used a tiny paintbrush and black acrylic paint to go over the image and define it. Top coat to top it off and you're done!


*I had the little strip of holo stickers at the tip of my nail from the day before and just left it on (not that I would know how to easily take it off). The strips are from Sally Beauty Supplies and you can get them here.
**Oh! Also another little note: I was stupid. I should've flipped the image on the computer so that it would turn out correctly, so I would suggest doing that.
***Another stupid move: I could gone over it twice to make it really solid, but in real life you can't really see the unsolidness.
Saturday, March 10, 2012
Pink Leopard Mani
This manicure is easy. Go ahead, give me your crazy looks that I got when I told people that, but it really is! (Not to mention, there are tons of color combos you can use!) For this mani I used Sinful Colors' Easy Going as the base and two coats gave me my solid blush color. (I love this color, by the way. Like, love.) Then for the spots I used Sally Hansen's Nail Art Pens in black and coral! (The coral is from the new summer collection that came out recently and they had several other cute colors too!) I really like Sally Hansen's pens because if you mess up, they come off easily with water and your mistake is gone! (Also, this is why it's really important to use a top coat, otherwise your designs will be washed off easily!) Okay so first I did my base color and waited for it to completely dry. Then, I made odd shaped ovals with the coral pen and then I used my black pen and did two lines sort of on either side of each odd shape! See? Easy! Give it a try and let me know how it goes!

Wednesday, February 29, 2012
Leap Day Mani!
Happy Leap Day!! In honor of this extra day, I'm giving you all an extra mani! (Like one mani doubles as the base for another, sort of thing.) Okay, so I recently bought Sinful Colors' neon pink #920 and I was SO excited to finally find a neon that I liked! (The other "neons" that I found before just weren't that bright and, well, neon.) I did two coats of it and it was totally solid. Also, it dries somewhat matte, so that's good if you're into that. (I prefer shiny.) Anyways, I couldn't deal with just plain neon on my nails, so I did one coat of China Glaze's Fairy Dust... it sparkles so much! So I left it that way for like a day, but it was still too neony for me (I know, I'm ridiculous), so I decided to pair it with Ulta's Smoke Screen. I taped my pieces of tape diagonally across each nail, did one coat of the charcoal, let it dry, then did a second coat and peeled off the tape right after I applied the second coat. (I waited to remove the tape after the second coat on one nail and it got too gunky and just made it gross and uneven.) Did one coat of my top coat to seal it all and done! It might sound complicated, but it truly isn't. I got several compliments on them, with one girl even saying she was going to do them the same! Hope you all enjoyed your extra day!


Hehe.. get it? Because they leap? I know, I'm a dork.
Sunday, February 26, 2012
Oscars Nails
So today is the Academy Awards and I fully celebrate them. I plan on plopping down at five with my popcorn and computer, ready to comment on all of the celebs' outfits. (And obviously I'll be wearing my Oscars shirt, duh.) Anyways, I did a little ode to the Oscars on my nails this weekend, and let me tell you, everybody loved them. They are SO simple though, it's ridiculous. All it is is black polish (I used two coats of Wet N Wild's Fast Dry #229C Ebony Hates Chris) and two coats of Milani's Jewel FX #531 Gold. I got soo many compliments on it from complete strangers!!


These pictures really don't do the glitter justice at all.. It shines so, so much. I love it.


These pictures really don't do the glitter justice at all.. It shines so, so much. I love it.
Subscribe to:
Posts (Atom)